
Introduction
In the first installment of this series, I detailed how I went about creating my virtual network and implementing Wazuh as a SIEM to help me monitor security events on my network. Additionally, I performed a penetration test on the network and looked for indicators of compromise to see what I should be looking for when analyzing network security events. There was one thing that stuck out to me after this experiment: this could have easily been prevented by spending some time segmenting the network to prevent access from a random device that found an active ethernet jack in a building. Ideally, only trusted devices should have access to internal resources, and any other device that manages to gain access to the network should only be able to see a limited subset of information – this limits the scope of attacks and makes it significantly harder for an attacker to find and steal information. In today’s report, I’m going to detail how I went about segmenting my virtual network inside of VirtualBox, how I added a firewall to restrict traffic, and how I implemented this solution into my existing Homelab.
Requirements and Planning
The first objective of today’s experiment is implementing network segmentation, which is the concept of physically or logically isolating functions of the network to make an attack more difficult. Segmentation can be achieved physically by running separate switches for each segment of the network, or logically using VLANs (or Virtual Local Area Networks). VLANs work by tagging every packet with a VLAN header (also called a 802.1q header), which identifies which virtual network each packet should be sent on by a switch. My goal for this experiment is to implement virtual segmentation on VirtualBox, ideally using VLANs (_spoiler: this plan changes pretty quickly).
Secondly, I want to implement a firewall to block any attacks from accessing my network. My plan is to use pfSense, a free firewall that is known very well in the homelab community. The firewall will need to act as a router between the virtual networks, and block any traffic that may lead to an attack. Additionally, my firewall needs to send its logs to my Wazuh server – acting as my SIEM. This will allow me to correlate alerts generated by the Wazuh agents running on my machines against any firewall alerts that happened at the same time.
Installing pfSense
I opted to start with installing my firewall before moving forward with segmenting my network. Also small disclaimer – this is not a tutorial, so while I may not provide extensively detailed steps about everything I did, my goal is to write in enough detail that it is clear how I executed each general step.
First, I started by ordering the installer from the pfSense store. With the install ISO ready, I ran the disc image on a new virtual machine in VirtualBox. At this point I need to have multiple network interfaces active on the pfSense VM – one for internet access, and one for local network access. I decided to set adapter 1 (eth0) to NAT (Network Address Translation), and adapter 2 (eth1) to intnet – a local network that all of my VMs reside on.
With these network adapters set, I went through the setup process. The only decision that needed to be made at this point was concerning the network adapters, with eth0 set to WAN (Wide Area Network – AKA the internet) and eth1 set to LAN (Local Area Network). At this point the installer ran on its own until it was finished, at which point I rebooted the VM and visited the web interface on a separate VM.
Since I was already using 192.168.100.0/24 for my network, I assigned pfSense 192.168.100.2 and was able to access the web interface by typing that IP address in a browser window. At this moment, DHCP is still being managed by my Domain Controller machine running Windows Server. After logging in to the web interface and changing the administrator password, I went through the setup process to get the firewall running – mainly taking default settings as I was going to do the bulk of the configuration later. At this point in the process, any machine on my network could access the internet through the firewall using the default pfSense ruleset.
Segmentation – Trial and Error
This is where things get a bit messy – I made a pretty big misstep in my logic for how pfSense would handle network traffic. While looking around on the web interface, I noticed that VLANs could be added as interfaces, so I went ahead and configured these so I could go about segmenting my network. My belief in this moment was that I could create the VLANs on pfSense, and then use that to assign each machine to the correct virtual network (please keep in mind, this was late at night and I was exhausted. In hindsight, this was fundamentally flawed thinking).
The flaw with this thought process boils down to how networks operate – specifically with the OSI model. VLANs and switches operate at layer 2 (the data link layer) while routers and firewalls operate at layer 3 (the network layer). I was attempting to use a firewall to not only control the flow of packets, but to also tag each packet with the appropriate VLAN tag and manage all of the virtual networks. Whoops.
VLANs
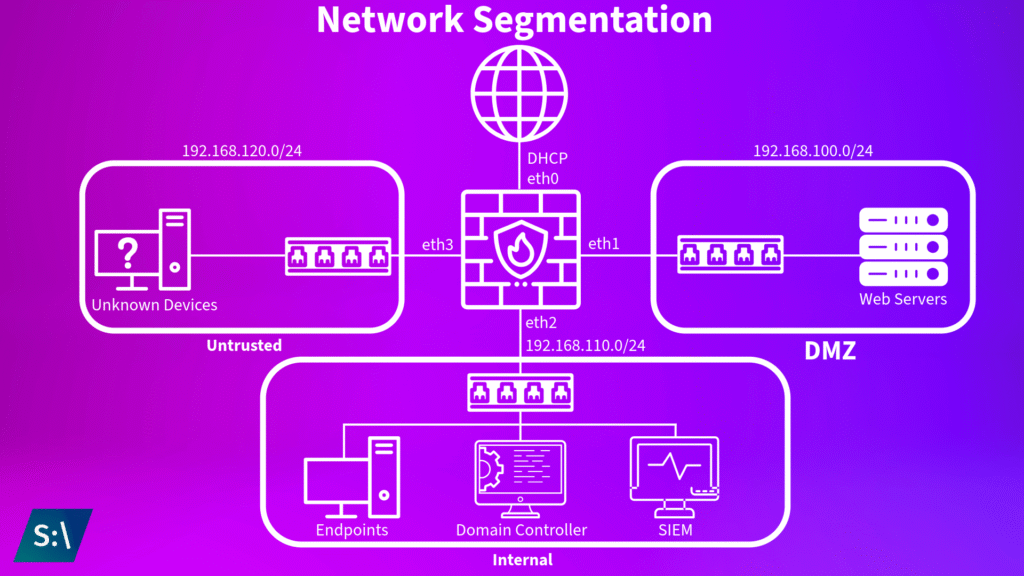
While this is obviously not the path I followed to completion, here is what I did. Take this more as an example of what not to do. I started by assigning a VLAN to each zone of my network. For this lab, I decided to create three distinct zones: Internal, DMZ (Demilitarized Zone), and Untrusted. The Internal zone would be used for any trusted devices, like my endpoints and management servers. The DMZ is for any publicly facing resources, primarily any web servers that could be hosting websites to the public. Lastly, the Untrusted zone covers anything that doesn’t fit in the Internal or DMZ zones, and acts more as a quarantine zone for unrecognized devices. This setup would allow for me to effectively manage the flow of packets with broad rules covering zone to zone traffic, which makes for easy network management. The internal zone was assigned VLAN 10, DMZ was assigned VLAN 20, and the untrusted zone was assigned VLAN 30.
With these VLANs created, I had to start DHCP servers for each zone so any devices connecting to the network could be assigned IP addresses. I already have a DHCP server running on my Domain Controller, however at this point it is more effective to have DHCP managed by pfSense – so I removed the DHCP server functionality from my Domain Controller.
With the DHCP servers running on each VLAN, I decided to test…and this is when I realized my mistake – it was not possible to add any device to any VLAN that I had created. This is because VirtualBox’s virtual switch does not allow for VLAN tagging, as it acts more as an unmanaged switch. At this point I realized that there was no way to make the VLAN strategy work, and instead had to return to the drawing board to think of a new way through.
Logical Segmentation in VirtualBox
While working through my options and looking at the network interface tab of VirtualBox, I realized that there was some network functionality that I could use to effectively mimic VLANs. When assigning a VM to use “intnet” (or internal network), you’re able to create multiple virtual networks within VirtualBox. In a way, these internal networks can act as my VLANs – if I was going to be setting up devices in an office to use a VLAN on a specific ethernet port at the wall, they would need to be configured at the switch to use the correct VLAN at that specific port. In a real world scenario I would need to modify the switch port to use the correct VLAN, in this configuration I am instead using VirtualBox to configure each device to access the correct “VLAN”. This was the approach I decided to use to segment my network within VirtualBox.
To do this, I first assigned each virtual machine their proper virtual network. My endpoints, domain controller, and SIEM were placed on the “internal” network, while the “DMZ” network holds my web server, and any unknown devices are placed on the “untrusted” network. In order to have these devices connect to the internet (and each other), I configured the firewall VM to use four network adapters: adapter 1 (eth0) is still connected to NAT in order to access the internet, adapter 2 (eth1) is connected to the internal intnet, adapter 3 (eth2) is connected to the DMZ intnet, and adapter 4 (eth3) is connected to the untrusted intnet.
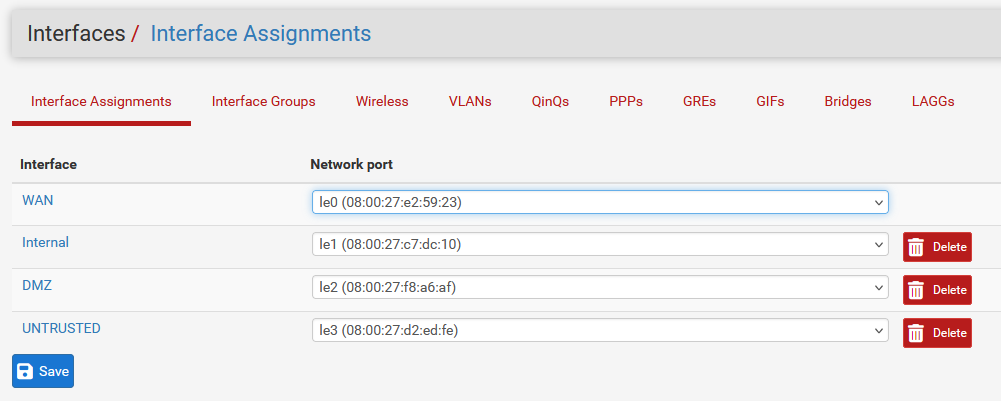
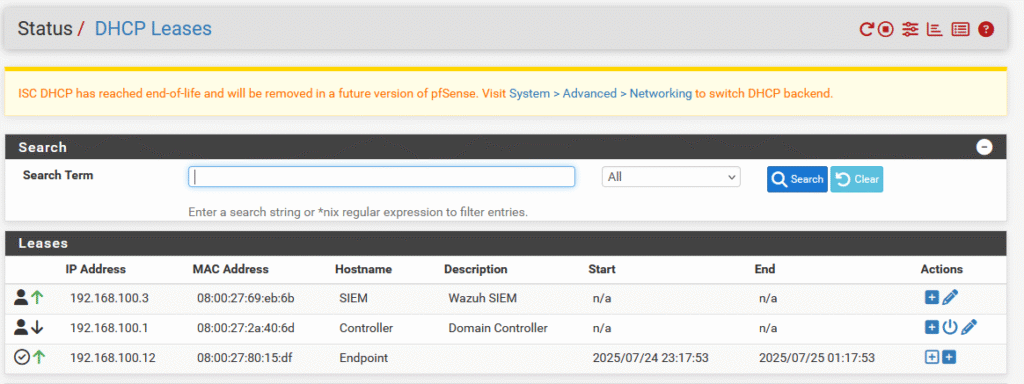
Similar to before with the VLAN attempt, each interface will be configured in pfSense. During this process, I assigned each zone a unique subnet. The internal zone utilizes 192.168.100.11/24 - 192.168.100.245/24, the DMZ utilizes 192.168.110.11/24 - 192.168.110.245, and the untrusted zone utilizes 192.168.120.11/24. These subnets are used as a pool of addresses to be used by the DHCP server on each interface, with some addresses reserved at the beginning and end of the subnet just in case. Speaking of reserved addresses, it was at this point that I utilized these reserved addresses for my important servers. The domain controller was assigned 192.168.100.1, pfSense retains 192.168.100.2, and my SIEM now utilizes 192.168.100.3. The domain controller and SIEM were given their addresses as reservations on the internal subnet, while pfSense is not assigned to any specific one subnet as it has access to all of my network zones.
With these zones created, each subnet is issued a DHCP server with the address pool assigned to ensure that devices are able to connect. For the time being, all devices on each subnet will still operate by receiving a random IP address from the available address pool, however this can always be converted to a reservation only system in the future.
Firewall Rules
With network segmentation in place, it is time to start adding rules to control the flow of traffic on the network. While each zone will be able to access the internet, I will need to manage the flow of traffic between zones. As a baseline configuration, here are the very high level rules that I’m going to be putting in place:
- Internal
- Can access DMZ
- Can’t access Untrusted
- DMZ
- Can’t access Internal
- Can’t access Untrusted
- Untrusted
- Can’t access Internal
- Can’t access DMZ
In addition to the rules above, pfSense includes an implicit deny rule at the bottom of the ruleset that will block any traffic that doesn’t match any preceding rules. Thankfully, pfSense makes it very easy to implement these rules in their web interface, so after keying these rules in, I am left with the following configurations for each zone:
Keep in mind that these are very broad rules, and as needed, additional rules will be created to allow specific services through. One rule that I can already think of being added is to allow Wazuh agents to send their reports from the DMZ to the Wazuh manager on the internal zone, as this traffic would be blocked by the firewall in its current state. The rules can be tested by trying to send ICMP packets across zones using the ping command in the terminal. For example, when trying to ping an internal device from the unstrusted zone, the packets are blocked and I am not able to receive any response from the internal device. Checking the firewall log, it can be seen that the packets were blocked due to matching a firewall rule – success!

Wazuh Integration
Segmenting the network and adding the firewall are great steps to protect my network, however I want to be able to view these logs in Wazuh so I can correlate them against agent event data.
If you found this blog post while trying to integrate pfSense with Wazuh and want to see the solution that worked for me, please skip to the solution here. In this initial section, I’m going to detail the incorrect steps that I took before finding the correct solution. While I could lie and act like I found the correct solution on the first try, that’s far from what happened. I spent weeks bashing my head against the wall and feel that sharing this experience is beneficial to see my thought process.
The Failed Attempt
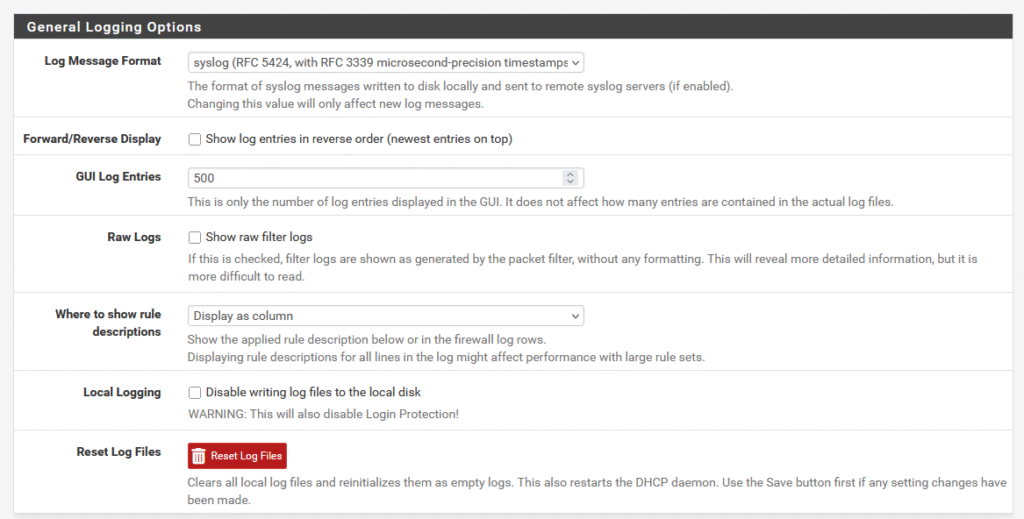
Going into this process of integrating pfSense with Wazuh, I figured that Wazuh would need to have support for ingesting Syslog files in order to trigger these alerts. This assumption was correct and led me to my first source on the subject from Wazuh. I also needed to configure pfSEnse to send its log data over to Wazuh, which I was able to do on the pfSense dashboard under Status -> System Logs -> Settings. I did need to change a couple of settings, notably that the log message format is syslog and that the source address of the log files is from the internal network zone.
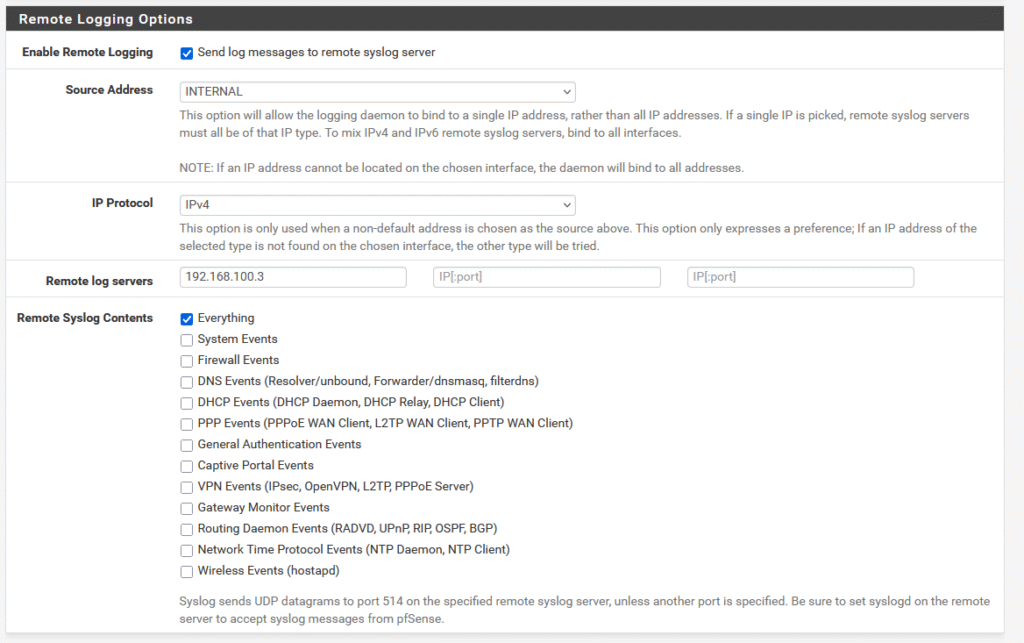
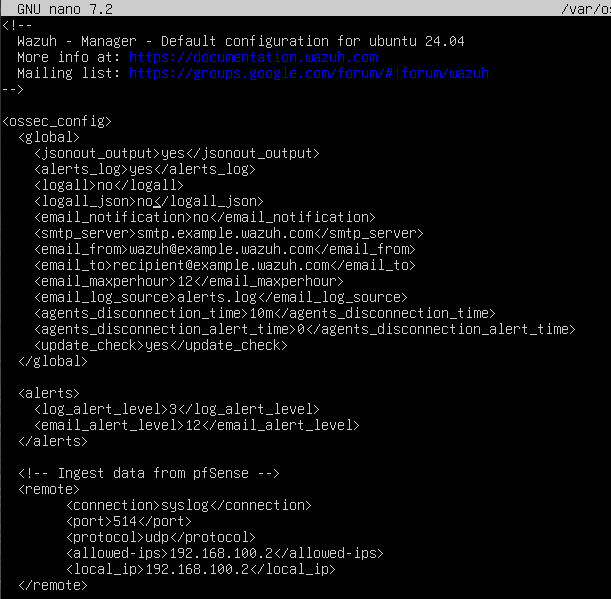
pfSense sends Syslog data via UDP instead of TCP, so I switched that out in the configuration file under <protocol>. After editing my /var/ossec/etc/ossec.conf file following the guide, I was left with the configuration below.
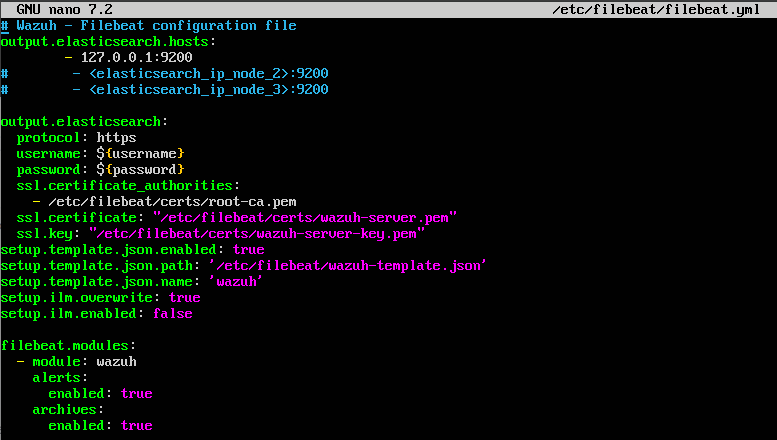
Another source that I had looked at suggested that I would need to change the way Wazuh logged alerts, via enabling the logall_json flag and changing /etc/filebeat/filebeat.yml to archive all events and show them in Wazuh. While I ended up not following this guide, it did point me in the right direction to show all events received by the Wazuh manager to appear in the dashboard. To accomodate this, archiving needs to be enabled. Thankfully, Wazuh has a detailed guide on how to enable archiving which made this process much easier. To do this, /var/ossec/etc/ossec.conf needed to be edited to enable logall and logall_json, which creates the logs in /var/ossec/logs/archives. After restarting the Wazuh manager using systemctl restart wazuh-manager, I had to edit /etc/filebeat/filebeat.yml to enable the archives by changing the archives flag to enabled: true. This left me with the following filebeat.yml file.
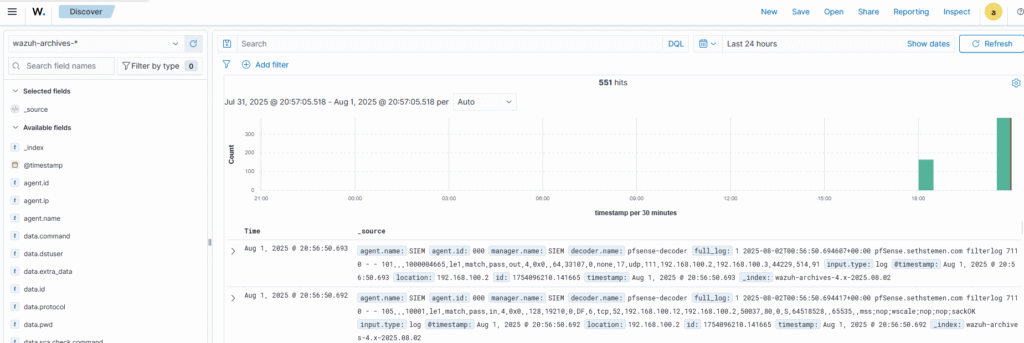
To apply these changes, I restarted filebeat with systemctl restart filebeat, and then navigated to the Wazuh web interface to configure the archives dashboard in discovery. While my end goal is to have alerts generated from pfSense logs, this is a good debugging step to figure out where everything is in the pipeline.
With the archives index pattern created, it’s now possible to find all of the archived events on the Discover dashboard by changing the index pattern from wazuh-alerts-* to wazuh-archives-*. However it was at this point that I realized my Wazuh manager was not receiving anything from pfSense.
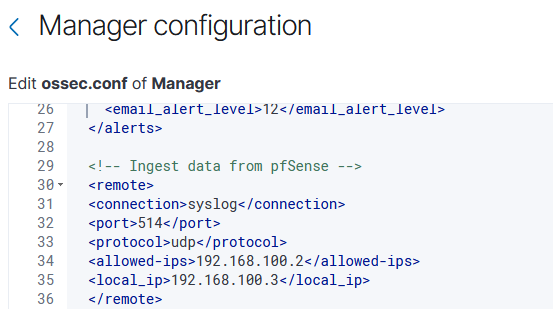
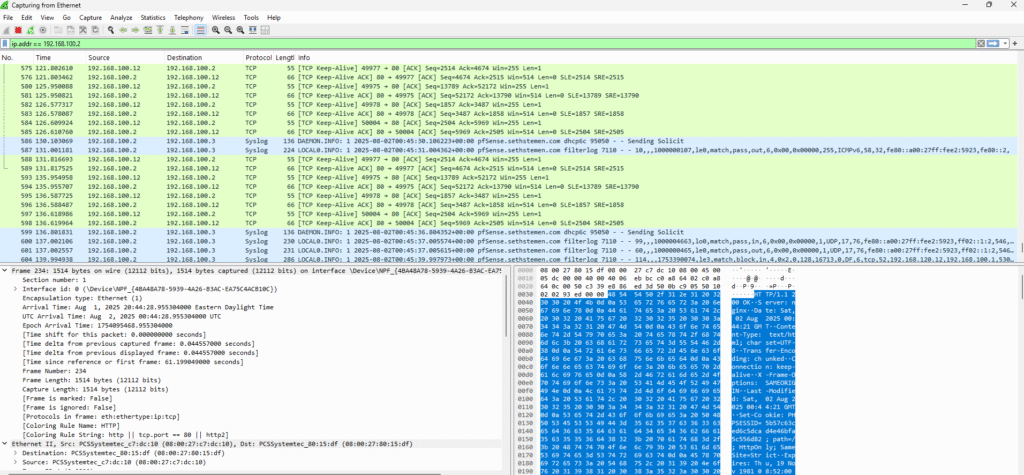
To diagnose exactly where the issue was, I opened Wireshark on an endpoint computer and performed a packet capture on the internal network zone to determine where the syslog data was going. Curiously, I didn’t see any syslog data leaving the pfSense firewall at all, and there was nothing in the firewall logs that indicated the syslog data being blocked. After a bit of trial and error (and a couple of days away from this project) I finally figured out what was going wrong: I had a typo in the ossec.conf file. Specifically, I defined the <local_address> as the same IP address of the Wazuh manager, so it wasn’t allowed to receive any data from the pfSense IP address. Sigh.
With this change made and the Wazuh manager rebooted, I still noticed that nothing was appearing in the archives section on the Discover tab. When booting up the packet capture again, I noticed that nothing was leaving the pfSense firewall once again. What ended up fixing this problem was just clicking Save on the pfSense dashboard one more time, which retriggered pfSense to send Syslog data to Wazuh. At this point, I could see syslog packets moving from pfSense to Wazuh – one major roadblock done.
At this point, I needed to set up a decoder for the pfSense data so Wazuh can parse and understand it. I started with a pretty simple decoder structure: It takes the regular expression (denoted as <regex> in the decoder file) of the log data and extrapolates the data from this expression.

With this decoder in place, I started creating rules to dictate how Wazuh would treat pfSense events. This ruleset was pretty simple: One for an allowed event, and one for a blocked event. This would be easy to keep track of and would be a good starting ground, allowing for additional rules to be made later.
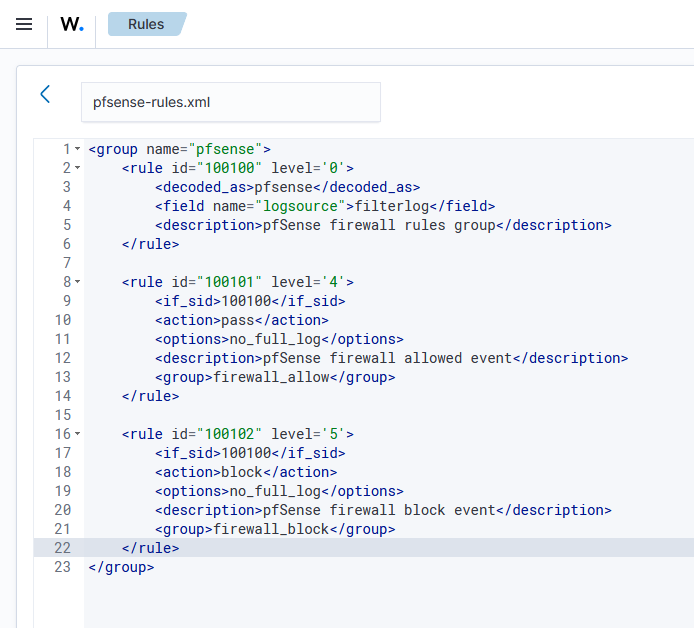
While doing some searches on the subject of creating rules, I discovered that Wazuh already had rules created for pfSense, and they actually were basically the same as the rules I had created but were already incorporated into the ruleset files. Because of this, I ended up discarding my custom ruleset and operated with the provided rules. With the decoder in place, events from pfSense started appearing on the wazuh-archives-* dashboard.
The problem that is now appearing is that rules aren’t being decoded correctly, and it seems that the data fields from each log entry aren’t being extracted correctly by the decoder either. This is what stumped me for several days, as I beat my head against a wall trying everything I could think of: Different decoder regular expressions, different rulesets, different log formats. None of this seemed to work. So originally, I planned to post this update as more of an in-progress update on integrating pfSense with Wazuh, as I wasn’t sure how long it would take me to get a working solution.
The Breakthrough
Like many things in life, the solution to this problem presented itself in the most unexpected way possible: a random Reddit post that was served to the top of my feed, with someone else experiencing the exact same problem. I had seen many posts on different platforms of people having trouble with the integration, but none of the supposed solutions ever seemed to work. Figuring that this post would be the same, I decided to click in to it and see if anything was different. There was a different source provided that had different steps, but something was different: the reasoning felt concrete, and they had definitive proof that their solution worked at the bottom of their post while many other people didn’t include steps for testing and validating their solutions. I booted up my lab once again and gave it a shot, and surprisingly, it worked flawlessly.
The Definitive Solution: Integrating pfSense with Wazuh
Major shoutout to Marcel Truong-Chun and his detailed post covering this issue, without his writeup I would have been stuck for a very long time on this part. I’m going to write down the general steps that I took, however if you were also experiencing issues with integrating pfSense with Wazuh I encourage you to read Marcel’s post and follow his excellent instructions. It turns out that the behavior I was seeing with my decoder not properly extracting the data fields was a sign of the core issue: pfSense doesn’t include hostnames in the syslog header, which is compliant with RFC 3164, but is not compatible with Wazuh’s decoder. Marcel’s workaround is to forward the syslog files to a syslog server running on the pfSense machine, which in turn sends properly formatted syslog files to Wazuh.
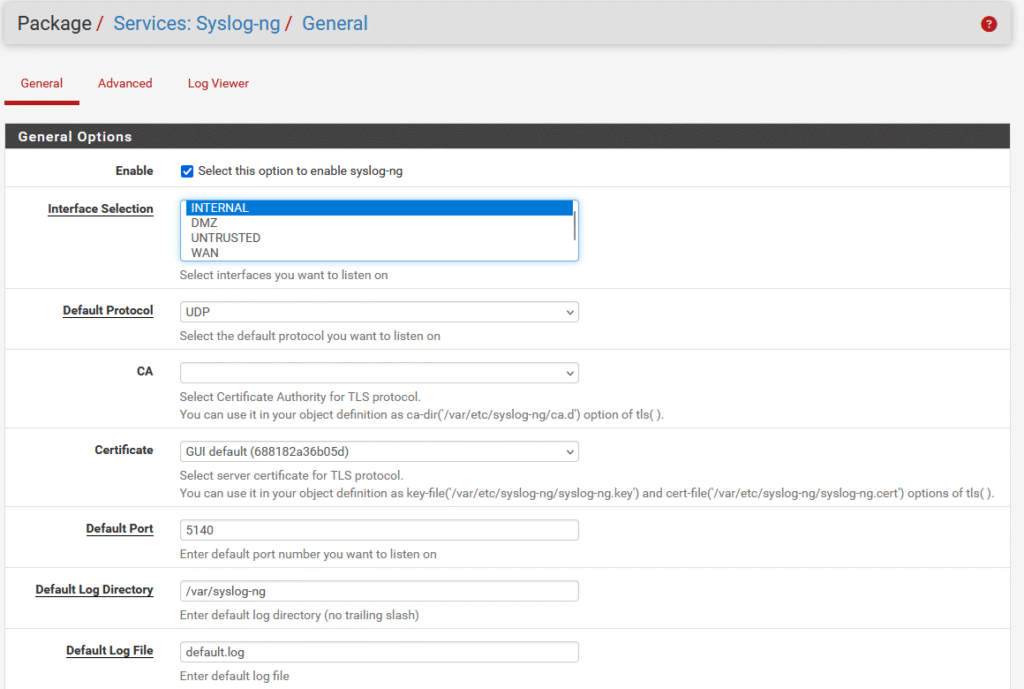
The first step in this process is to install the syslog-ng package from the pfSense package manager, which can be found in System -> Package Manager. This is the service that is going to send the correct logs over to Wazuh in a format that is decodable by the default decoders built into Wazuh (which means I wasted a bit of time writing decoders and rulesets. Whoops). Another major change that needs to be made is that pfSense needs to send its logfiles over the loopback interface (AKA 127.0.0.1) so syslog-ng can receive the log files without sending traffic over the network. With this package installed, it needs to be configured to listen for log files. I set syslog-ng to listen on the Internal zone and on the loopback address.
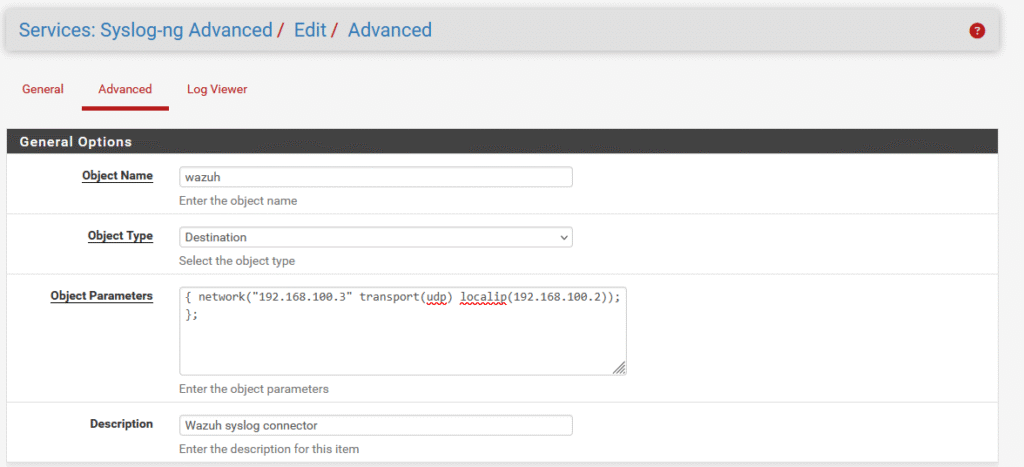
With the interfaces configured, a destination object needs to be created – this is the IP address of my Wazuh manager. In the object parameters, I set syslog-ng to send log files to the Wazuh manager (192.168.100.3) over UDP from the reserved IP address of the pfSense firewall (192.168.100.2).
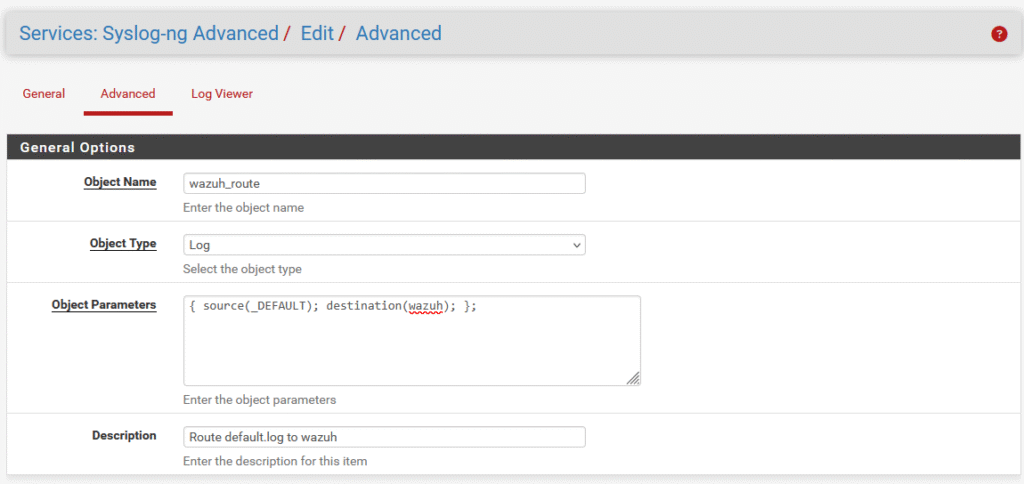
The last configuration that needs to be done in pfSense is establishing the route from syslog-ng to the Wazuh manager, which can be done by creating another object of type Log. In this object parameter set, I define that the default route will be taken to reach the Wazuh machine.
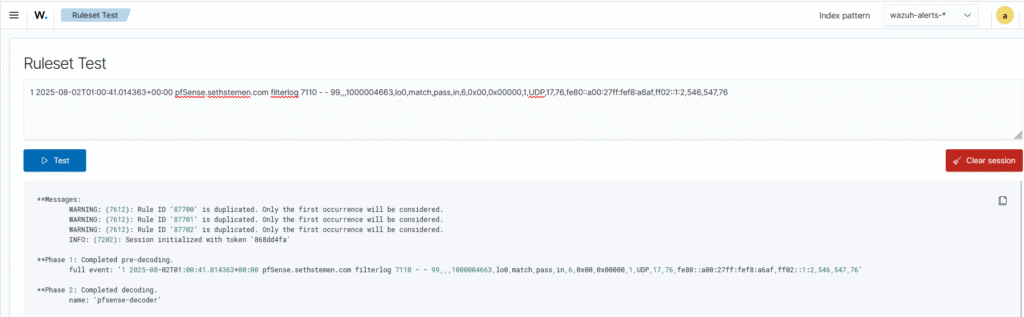
With these objects created and saved, I performed another packet capture and saw syslog traffic flowing across the network from pfSense to Wazuh. Checking the wazuh-archives-* index pattern in the Discover tab, log entries from pfSense have started appearing with the correct format. This can be verified by using Wazuh’s ruleset test feature, where I copied and pasted the log entry to see if it could be correctly decoded and identified against a rule.
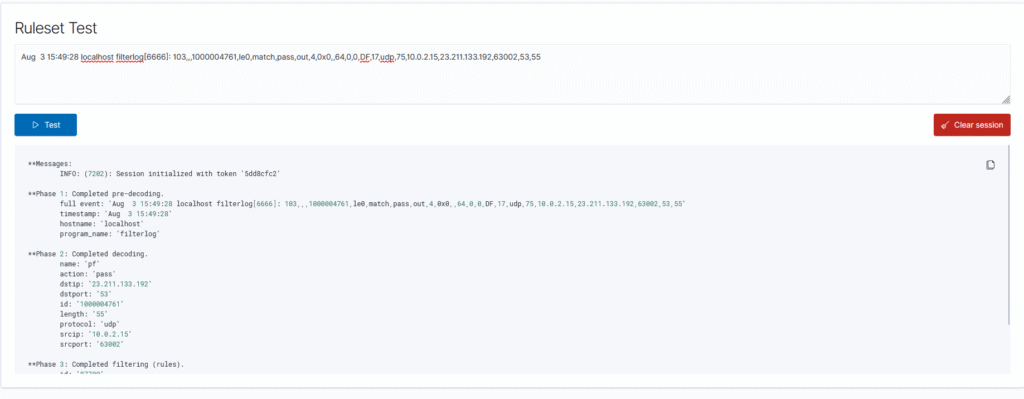
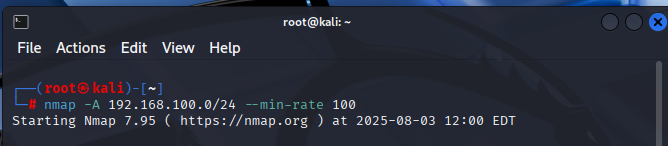
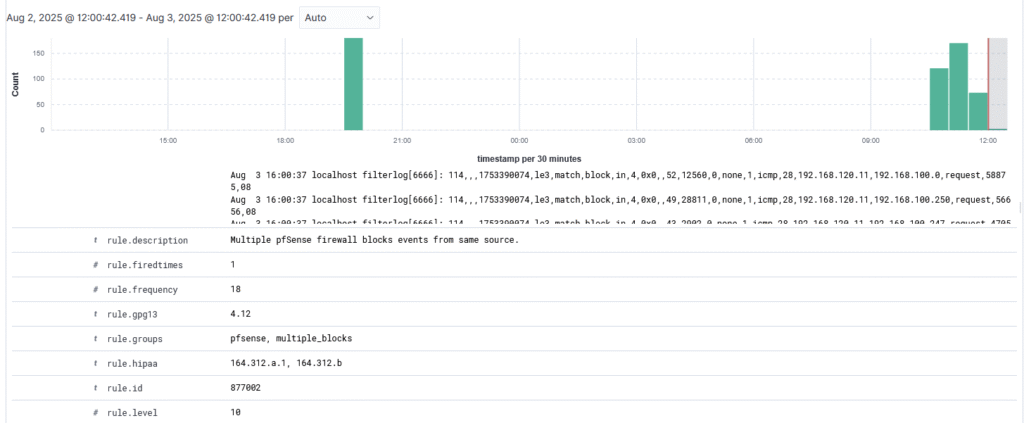
Surely enough, the log entry matched against the built in pf ruleset and extracted the data correctly, which means all of these entries should now start showing in the wazuh-alerts-* index pattern. Keep in mind that alerts will only generate when the rule has an alert level above 0, so I need to manufacture an event to trigger an alert. To do this, I went ahead and used the test that Marcel used on his setup: running an nmap scan on a subnet that was configured to be blocked by the firewall, as multiple blocked attempts will trigger a medium level alert. I connected my Kali Linux virtual machine to the Untrusted subnet and attempted an intense nmap scan against all of the hosts in the Internal subnet.
After running this scan for a few seconds, I checked the Wazuh Discover tab and found that the block rules had worked, and an alert was triggered at level 10
Takeaways
So I can now finally say: pfSense is integrated with my Wazuh instance. This was honestly a lot more difficult to configure than I anticipated, but that was moreso due to me doing a lot of research and trying many different proposed solutions instead of trying to derive a correct solution from scratch. To be completely honest, there’s no chance I would have identified the incorrect header in the syslog format for quite some time as I didn’t have much knowledge in the syslog format before working on this project.
Something else that stood out to me while working on this project is that my computer is starting to bottleneck the performance of all these VMs. It wasn’t uncommon for the Wazuh dashboard to start throwing a ton of errors while I was working on the decoders or rules, only to find that a reboot of the Wazuh VM would solve the issue. My computer is pretty good in terms of specs (Ryzen 7900X, 32GB DDR5 RAM), and I honestly expected the RAM to be the primary bottleneck for these experiments. Surprisingly, the actual bottleneck is the SSD, which is pinned at 100% utilization whenever I’m conducting these experiments. It’s becoming evident that I’m most likely going to need to purchase another NVMe SSD to split the load across multiple drives if I wish to continue this lab on only one machine. The other option is to use a couple of old computers that I’ve found recently to create a physical lab, but the inefficient hardware means that I’d be making a big increase in power use whenever I ran an experiment. I’ll keep weighing my options to see what works best in the long run.
At the end of the day, this experiment was very informative and helpful for learning how firewalls are deployed in real world scenarios. My rulesets are very basic currently and will need to be updated later, but for now I believe this is a good baseline to start with. In the next installment, I plan to look at Intrusion Prevention Systems (IPS) and integrate the most promising candidate into my lab environment.